Showing posts with label Baking. Show all posts

Thursday, 23 June 2011

Strawberry Bread (Joy of Baking Recipe)

Since we have loads of strawberries right now, I thought I would try another strawberry recipe.  This time, it is Strawberry Bread, from joyofbaking.com.

Unlike Banana bread, where the ingredients are pretty much stirred together (great for lazy cooks like me), Strawberry bread is made quite like a cake, i.e., the butter and sugar are creamed before the flour is mixed in. This meant that my Kenwood Major would get its first use!

The ingredients are pretty much the same as a standard banana bread, except of course one uses strawberries instead of bananas.  It also uses sour cream or yoghurt  (I used yoghurt).  I received a little help from my boys, but they spent most of their time watching the Majoy whirr away...

My strawberry bread came out a little too brown.  In fact, the crust was ever so slightly burnt at some spots.  My oven might have been a bit too hot, though I don't know why since my oven thermometer showed the right temperature. I had even turned it down slightly when I thought it was getting burnt.

The crust was thick (which I suppose was the result of the hot oven).  But, the insides were nice and soft! It was not as sweet as a banana cake, which is fine by me. The softness of the cooked strawberries contrasted beautifully with the crunchy walnuts (which were toasted before chopped roughly and added to the batter).  This was very nice!

This recipe received positive reviews from my tasters.  One neighbour also asked me for the recipe, after declaring its deliciousness.

Between this and the Strawberry-Banana Muffins, however, I think I prefer the muffins.  The strawberries in the muffins were not as cooked as those in the bread, and so were still nice and jammy.  Those in the bread had been cooked much longer, and had given up most of their flavour and colour to the bread.  I'm not saying that I don't like the Strawberry Bread though, coz it is certainly very yummy!

Tuesday, 21 June 2011

My Kenwood Major

A very handsome Major.
Introducing the latest addition to my kitchen! The Kenwood Major Titanium KM0040. All gorgeous in silver and stainless steel.

My Major working hard!
I had previously been using my mum's Kenwood mixer from more than 20 years ago.  It is still working fabulously.  So I finally decided to get my own.  Hopefully it will last me a good 20 - 30 years too!

Thursday, 16 June 2011

Strawberry-Banana Muffins (Joy of Baking Recipe)

Fresh out of the Oven
It's the school holidays and I finally found some time to bake!

I had a couple of very ripe bananas sitting in my kitchen and the Joy of Baking website (one of my go-to sites) was featuring a Strawberry-Banana Muffin recipe.  I thought it sounded much more interesting than the usual banana or blueberry muffin recipes that I do (although I think plain ol' banana or blueberry muffins are quite yummy).


It was a simple recipe, using regular ingredients.  Of course, it's a bit more work than a regular banana muffin as the strawberries need to be cut up. But I had help from the boys with the mixing and mashing and spooning out.


Strawberry goodness oozing out...

There is quite a lot of batter to make 12, so each muffin cup was filled quite well.

The boys couldn't wait to try it, even though Jr really dislikes strawberries.

Once done, I noticed that the muffins had risen beautifully, and the strawberries had cooked into a juicy and jammy goodness which oozed enticingly out of the muffins.

A very soft and tender crumb.
The muffins were beautifully moist, soft with a nice tender crumb.   There was a slight tartness of the strawberries which made it quite lip-smackingly moreish...yummy.

What a brilliant way to use strawberries which are just a bit too sour to eat in large quantities.  The supermarkets have berries on promotion right now.  I'll probably be making this recipe again soon. I might also explore other recipes that use strawberries.

Wednesday, 4 March 2009

Double Apple Pie, Nigella Lawson, How to be a Domestic Goddess

I had always been intrigued by Nigella's Double Apple Pie but never got round to making it because the thought of peeling and coring all that apples just did not seem like a very good use of my time. But with my brother recently back home for the vacation, I decided to take advantage of his enthusiasm to finally make this pie.

Firstly, I'm not very good at pastries. In fact, I suck at it and had real trouble with this one. I just couldn't get it to roll out properly. I was wondering if it had anything to do with the recipe, but I googled it and found that no one else had my problem. I guess as with all things, practice makes perfect, and I will be practising more. She does make it up in the food processor, as opposed to by hand. Perhaps next time I'll try the traditional method. It could be easier. Anyway, back to the pie.

The recipe calls for two different types of apples, hence the "double" element of the pie (no, it's not referring to the size, though it is a rather big pie, and it's baked in a Springform tin). I can't find Bramleys or Coxes here in Singapore, so I used Granny Smiths (for the green Bramleys) and Fuji apples (for the red Coxes). The green apples were to be mashed, and the red ones were to be chunky.

The shortcrust pastry is slightly different from regular shortcrust patries, in that it uses Cheddar in the mix. It may sound weird, but they actually go so well together. I recall as a little girl, I loved eating cheese with apples - in fact that was the only way my mum could get me to eat cheese.


I really enjoyed the pie. It was a very substantial and sliceable pie. It was great when fresh and hot out of the oven. When it cooled, I thought the pastry was a bit tough (my fault), but the filling was great, especially since the apples were of different sizes and textures. My husband, surprisingly, loved the pastry, but wasn't so keen on the filling because he thought the apples were too chunky. I guess he likes them small a la MacDonald Apple Pie. I would love to make these again, but now that my brother has gone back to school, it might be awhile...

Thursday, 19 February 2009

Butterscotch Layer Cake, Nigella Lawson, How to be a Domestic Goddess

I realise that I've been doing A LOT of chocolate recently. Probably too much. What can I say. A girl just loves chocolate.

Bucking the trend, I baked Nigella's Butterscotch Layer Cake for my mum's birthday (once again, with the able assistance of my brother).

This recipe surprised me. It's basically a sponge cake recipe with light muscovado sugar and a butterscotch-cream cheese icing.
It was great fun to make and a wonderful revelation. I loved it, even though it didn't contain any chocolate! (Oh, and mum and the others at our small party enjoyed it lots too.)

It was moist but not too damp. As always, the light muscovado in the sponge gave it a beautiful sweetness. It was very rich, but you could just go on eating and eating. The sweetness of the cake and caramel balanced by the sour-saltiness of the cream-cheese, so it was never cloying.

I would definitely bake this cake again. It's a gorgeous cake. And I hardly ever consider a non-chocolate cake as being gorgeous.

Saturday, 27 December 2008

THAT Chocolate Cake

This is the absolute best chocolate cake recipe I have tested.  It's from "The Essence of Chocolate" by Steinberg & Scharffenberger. I made it for the hubby's birthday.  My decorating skills are pathetic, so it doesn't look so good. But ignore how it looks. 


It's a lovely and moist cake, with a deep rich chocolate taste.  And it tastes better the day after! I could swoon about it all day, but I'll spare you, so I'll just leave you with these pictures (ok, my photo taking skills leave much to be desired...).


Friday, 3 October 2008

Butterfly Cakes

We planned a picnic to the Botanic Gardens with some friends. Since I had leftover ganache from the chocolate cupcakes (see previous post), I decided to bake some butterfly cakes and fill them with the chocolate ganache rather than the buttercream icing in the recipe.

Butterfly cakes are really just regular cupcakes with a twist. A little more baking powder is added so that the cupcakes rise a little more.
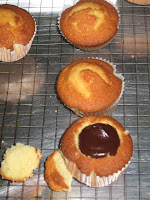
This, so that you can cut out a disc-shaped piece from the top of the cupcake, fill the cut-out section of the cupcake with icing, and fashion the cut-out piece of cupcake into butterfly wings and stick it onto the icing. Sounds complicated, but is really easy (for someone who always messed up in art class, take it from me).

The cupcakes were sweet. The ganache was bitter (I used unsweetened chocolate). The combination worked great together. Not as swoonable over as the damp chocolate cupcakes, but very easy to put together, and provides an nice variation to the regular cupcake. A very enjoyable treat. For a children's party, you could use a milk chocolate ganache, or a plain buttercream icing.

Thursday, 2 October 2008

Dense Chocolate Cupcake

For my church's fund-raising bake sale, I decided to offer up Nigella's Dense Chocolate Loaf Cake, modified into cupcakes. On paper, the recipe looked really good, and I had been dying to try it out for the longest time.

As this was my first time baking chocolate cupcakes, I had no idea how chocolate cupcakes should look when ready. The cupcakes had to spend 30 mins in the oven, which is much longer than the 15 - 20 mins for regular cupcakes, and I was concerned about over-cooking them. Because of the chocolate content, the cupcakes came out of the oven looking rather scarily black. It was hard to tell if they were over-cooked. Or under-cooked!

But I needn't have worried. Miss Nigella is right. The cupcakes turned out beautifully. They were wonderfully moist and chocolatey, and had the most amazing aroma. The critical ingredient for this recipe, I believe, must be the dark muscovado sugar, which I had much difficulty sourcing, so much so that when I stumbled upon it, I bought a stash for my cupboard. (If any of you need any in Singapore, they can be found at Tanglin Marketplace.) The sugar imparts a beautiful depth to the flavour of the cupcake. And unlike Nigella's other recipes, I was able to use the recommended amount of sugar, without having the end-product tasting too cloyingly sweet (a consistent weakness I find in Nigella's recipes). I will try the cupcakes with other types of brown sugar next time to see how it affects the flavour. I would definitely not use white sugar.

But this is not all. I decided that since these cupcakes are for sale, they deserved some prettifying. So, icing was needed. And Nigella provided a wonderful chocolate ganache icing accompaniment. I am pleased to report that this time round, I melted my chocolate perfectly. (Read my previous post describing my disastrous chocolate melting experience.) I took up Katong Gal's suggestion, and melted the chocolate and cream in a bowl above simmering water. Once about a third of the chocolate started to melt, I turned off the heat, not allowing the chocolate to overheat at all.

I had a treat icing the cupcakes, and topped them off with sugar rosebud I bought from a specialty baking shop (Bake it Yourself). Apart from tasting damn good, the cupcakes looked real good too. My husband, who doesn't usually bother with cupcakes, enjoyed them thoroughly.

The decorating must have been a good idea, as the cupcakes sold out at the bake sale. :-)

Wednesday, 27 August 2008

Coca-Cola Cake

It was my mum-in-law's birthday. Rather than get her the run of the mill beauty product/spa voucher as a present, I thought it would be nice to bake her a cake, especially since I know she rather likes my baking (or at least I'd like to think that).

Since I am down with the flu, I had to choose a recipe that wouldn't involve too much shopping, and that would be quick and easy. Nigella's Coca-cola Cake recipe was just the one. I had everything in my pantry, apart from the yoghurt (in place of buttermilk, which I happen to have, but I'm saving it for pancake...) and coke. I didn't have golden caster sugar either, and I haven't seen it at all here, so I just used regular caster sugar.

It was pretty straightforward to make. The only fiddly bit was having to line the springform tin with foil as the batter was very thin and would otherwise leak. I also had to leave it in the oven for about 50 mins instead of the recommended 40, and even then, I don't think it was fully
cooked through (saw damp bits after the cake was cut). But by then the top of the cake had cracked rather badly, so I thought it was time. (There must be something wrong with my oven. Will need to get an oven thermometer sometime.) Anyway, I just trimmed off the peaked sections (chef's treat!), and covered the cake up with the cola icing, which by the way was way too much and way too sweet, even though I had reduced the amount of sugar by about 20%.

The cake had a really lovely texture. Nice and moist. And you don't taste the cola at all. Though I must say, it could've done with less sugar (and I had already put in less sugar into the batter and the icing). The other disappointment I had was that it wasn't as chocolatey as it looked. But I suppose, it is afterall a Coca-Cola cake and not a Cocolate cake. I would do this again as a birthday cake or maybe as cupcakes. But not for dear hubby, as he still prefers Nigella's cheesecakes.

PS: I discovered not long after that this is actually a Southern recipe. I used to see it on the specials menu at the Cracker Barrel restaurant in Montgomery, and I had never ordered it as I thought it was a weird combination. Now I wish I had tried some during my year there.

Tuesday, 8 July 2008

Blueberry Muffins - Take 2

Blueberries are in season now! I wasted no time in making up a batch of blueberry muffins. I usually use dried blueberries for this, and they taste quite wonderful. With the fresh blueberries, they were exquisite. The blueberries burst in the muffins and bled their wonderful juice into the muffin. Really very very good. Too bad my boy doesn't fancy blueberries.


I'm totally inspired to find more blueberry recipes otherwise I'll just be making blueberry muffins and blueberry pancakes this entire blueberry season...

Saturday, 21 June 2008

Milk & Cookies, Yummy in my Tummy

The school holidays have come round again, and there are only so many outdoor activities you can do with a 3 year old. It was time to bake some cookies and I picked Nigella's recipe for Butter Cut-Out Biscuits (i.e. cookie biscuits, not American biscuits).
These biscuits were dead-easy to make. But make sure you have some time on your hands as you will need to chill the dough in the refrigerator for at least an hour. First, you cream together the butter and sugar, then beat in the eggs before mixing with the dry ingredients. (As usual, I used a bit less sugar than in the recipe.) You form two fat discs with the dough, and clingfilm them for chilling in the refrigerator.

After an hour, we retrieved one disc, rolled it out and started stamping. My boy had great fun with this part. We used number-shaped cookie cutters (just as Nigella had done) and also some other small shapes. We were able to cut out so many cookies (running out of space on the baking sheet), that we decided not to use the other disc of dough, but to freeze it for use some other time.

They took hardly any time to cook and tasted really buttery and had a nice meltingly smooth texture to them. Beautiful with milk! It felt so old-fashioned and comforting.

We iced some of the cookies for effect (since the recipe calls for it and it looked so pretty in the picture). But I left a good number plain as I did not want Junior to get a sugar-high and start with the tantrums (which he did anyway coz he stole a few iced biscuits).

I will definitely be doing this again, seeing that I have the other disc of dough in the freezer, but this time, no icing necessary...

Thursday, 19 June 2008

Lily's Scones

I bought a new baking board, and with friends coming over for bible study, I thought that it was finally time to make some proper scones. Nigella has just this one scone recipe in the Domestic Goddess, which she describes as "the best scones I've ever eaten". But she would say that wouldn't she? Anyway, my previous attempts at scones weren't too successful, so I was hopeful this time round.

Apart from the usual suspects of flour, butter and milk, the ingredients also included shortening, cream of tartar (which, according to Nigella, gives the appearance of cellulite, but which also gives them a "dreamy lightness") and salt.

First you rub in the fats with the dry ingredients. Then you pour in the milk, mix briefly before turning it out to knead. The hard part I found was kneading the dough, especially since the mixture is very sticky. Your hands will get really icky but bear with it and you will soon be able to roll out the dough and stamp out the scones with a cutter. I managed to form 15 pieces (the recipe says it makes 12), but I think it was because I rolled the dough out a bit thinner than the recipe called for. Then you egg-wash it before you put it into the oven.

These take 10 mins to cook. And are lovely. They are firm on the outside, and really soft and light on the inside. Wonderful on its own or with some jam and cream. They are the best scones I've made. Though I think, because of the salt and shortening and the lack of sugar, they taste more like Biscuits (a la the American South), than scones. Frankly, these remind me more of my Alabama days than my England days. In particular, the Blue Plate Cafe (Memphis, TN) and the Loveless Cafe (Nashville, TN), where I had some of the best biscuits ever. Until I tasted their biscuits, I was not a fan of biscuits. Then, I was made a convert. I prefer my scones sweet, so I will continue to look out for a good scone recipe. But I will definitely do Lily's scones again, coz they're the closest thing to Blue Plate and Loveless I've got in Singapore!

Monday, 26 May 2008

Carrot Cupcakes with Cream-Cheese Icing

I had arranged a playdate with my friend V one Saturday, and it afforded me the opportunity to bake again (yay!).

I am not a carrot cake fan (I am a chinese carrot cake fan though...), and this recipe, with its cream-cheese icing appeared rather odd indeed. To me, dessert should involve chocolate, possibly vanilla, and maybe fruit, but certainly never vegetables. But my friend V likes carrot cakes, and I wanted something my boy could eat (he hates blueberries and raisins, chocolates are currently banned, and so are conventional cakes). So this looked like the perfect recipe. It just sounded so healthy (ignoring of course the amount of icing sugar that goes into the topping) - my boy was getting his veggies, and instead of butter it calls for sunflower oil! It was also an opportunity to use the (a) light mucovado sugar that has been sitting in my cupboard since the initial wave of shopping for nigella-esque ingredients; (b) half a tub of cream cheese in the fridge left-over from baking cheesecake.

It was a bit fiddly and wasn't as domestic goddess-ly relaxing as some of the other recipes. This one involved grating carrots, zesting lemons AND oranges, chopping walnuts. Even after the cupcakes were in the oven, you couldn't relax with a nice cuppa while waiting for them to be done, you had to make the icing, which also involved the hard work of beating the cream-cheese, sieving the icing sugar (which I halved), and squeezing some lime juice.

I must say, the cupcakes sans icing were surprisingly light (and maybe a bit boring). I had used less than the 100g light muscovado sugar in the recipe, and I think this is one recipe which you can actually use the full amount of sugar Nigella indicates. When paired with the cream-cheese icing, which on its own was sickeningly sweet, the cupcake become irresistible! One was certainly not enough. We had seconds. And more.


Friday, 16 May 2008

Meringue

Far too often, I've found myself with leftover egg whites from recipes that call for the yolks only. And the most recent one being the apple pie. Usually, I just dump the whites into some soup the next day or steam it up for lunch. I knew that I could probably find many recipes calling only for whites but I really keen to launch 2 back to back baking sessions just so I could use up the whites. That is, until I read Jamie Oliver's "Cook with Jamie" and read how easy it would be to whip up some meringues.
Basically, you need to make sure that all your equipment is dry and has absolutely no trace of oil. And you do need an electric mixer for this. I imagine it would be a pain doing this by hand.

Then you whip up your egg whites still they form stiff peaks. The test, Mr. Oliver says, is to turn the bowl of whipped whites over your head. They shouldn't budge. Then you whip in your caster sugar for many minutes, until the mixture is all smooth and shiny. Don't overwhip or the mixture could collapse. You could fold in various ingredients to get flavoured meringues, but I just left it plain. It goes into the oven, and you vary the cooking time depending on whether you want it all crisp, or crisp on the outside and chewy on the inside.

I managed to get 8 huge blobs from 3 egg whites. They looked really pretty and dreamy! Once done, they were beautifully crisp on the outside and chewy on the inside. They were really easy to whip up. My mum was impressed, as she has heard and seen enough about collapsed meringues.


I'm not sure what I can use them for though. I mixed them with some ice-cream, and it was good. The crispiness of the meringues with the creaminess of the ice-cream. You can't really eat too many of them neat, as they are rather sweet. Perhaps I'll test out an eton mess recipe, but the berries will be a bother to get as they are quite pricey. Anyway, the meringues are now sitting in the refrigerator looking rather forlorn.


Thursday, 8 May 2008

Apple Pie

After a wonderful tete-a-tete with my weighing machine, I had resolved to take a break from the wonderful world of baking. But my resolve didn't last long. I was reading Jamie Oliver's Family Dinners, and was drawn to the apple pie recipe like bees to honey. I tried to resist. But the picture of the half-eaten golden yellow apple pie in the book dominated my thoughts. All I could think of was apple pie. Even cinnamon would invade my thoughts (even though the recipe doesn't call for any cinnamon).

Finally, I caved in. Afterall, I rationalised, apple pie contains apples, and we are supposed to get our daily apple right? =)

So off I went baking again.

Apple pie is a whole new territory. I have never baked a pie, though I have often thought of it. I think I might have made some shortcrust pastry in Home Economics classes a long time ago, but I forget. The pastry appeared easy enough to make. All I needed to do was to dump the ingredients in the food processor and blitz.
However, the rolling it out and laying it in the tin showed up my inexperience. My dough was rather crumbly and kept tearing when I tried peeling it off the board, which I had liberally dusted with flour. Perhaps the humidity in Singapore (and the really hot few weeks we've been having) doesn't help. Of course, the fact that my pie dish was 9 inches rather than 8 inches, as required by the recipe, made it worse, as I had to roll the pastry out even thinner. But Mr. Oliver says it's OK if "it tears or breaks - just patch it up - as it will look nice and rustic". So I patched up as best I could, as my confidence was rapidly melting.
The second part of the recipe involved peeling and chopping the apples and cooking them into a saucepan with the rest of the filling ingredients (sugar, ground ginger, zest of lemon, sultanas). The recipe called for Bramley and Cox apples, but they aren't readily available here (if at all), so I substituted Granny Smiths for the Bramleys and Red Delicious and Gala for the Coxes. I also used regular brown sugar instead of the fancy muscovado/ demerara sugar.

As expected, I had a tough time getting the dough to fit the top of the pie. Witness the number of tears in the pastry. Also the pastry rim was very very thin.
The result was a not very nice looking pie. The pastry was a bit overdone and burnt at the edges because the pastry was thin, and I had failed to adjust the cooking time accordingly. But I was hopeful, because, the smells emanating from my oven were just heavenly!


I spooned out some pie, dolloped some custard on it and dug in. Oh my, it was good pie. It wasn't at all heavy. Not too sweet, either. It was almost perfect. For the next slice, I took out a tub of Ben and Jerry's Vanilla ice-cream and attacked. Ah, now, perfect...