Showing posts with label Jamie Oliver. Show all posts

Monday, 20 July 2009

Jamie Oliver's Onion Baguettes


Yet another variation on Jamie's Basic Bread Recipe. This time, you slice and fry white onions with thyme and garlic in olive oil and you spread it onto the bread after you shape it (and before the second rise).

It was exceedingly good. Unfortunately, I ended up with ciabattas rather than baguettes.

No matter. Everyone loved it anyway.


Monday, 13 July 2009

Variations on Jamie's Basic Bread Recipe: Raisins

So I was going about preparing to bake my usual batch of bread using Jamie's recipe, and I spied a pack of raisins in the refrigerator. I thought, "Wouldn't it be nice to have some raisin bread?".

Actually, Jamie does have a Raisin and Rosemary version, but I didn't have rosemary at home and there weren't enough raisins.

But I thought I'd just test out adding just a handful of chopped raisins into the dough (anyway, Junior hates raisins and I didn't want the bread to be so full of raisins that he couldn't eat it).

It turned out very well, actually. No disasters! As usual, it was beautifully soft on the inside. The raisins added just a touch of sweetness to the plain bread. It'd be nice to try out the Rosemary and Raisin bread recipe one day. But the next time, I'll have to bake plain bread again, because, for Junior, even a handful raisins is too many raisins for him!

Friday, 3 July 2009

Jamie Oliver's (really easy) Basic Bread Recipe

Finally! A recipe that works! Jamie Oliver saves the day. A wonderfully easy basic bread recipe which he claims, even kids can use. I love it. It's so easy. No need to worry too much about too little water. I think his use of the term "stodgy porridge" caused some concern, but I think we all roughly know wha t that's like. Here's a pictorial:


Step 1:
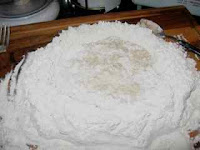
You start by dumping all the flour onto your work surface and make a big well in it, like a volcano.


Step 2 & 3: Mixing
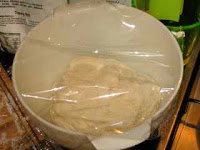
You add the yeast and water mixture and slowly mix it with some flour till it looks like stodgy porridge. Then you add the rest of the water and mix.


Step 3: Kneading

Then you start kneading. You later put the dough in a covered container to rise.


Step 4: Proofing & Shaping
The bread will rise (and how it rose!!). You punch it down again and shape it and leave it for another rise.


Step 5: Baking!
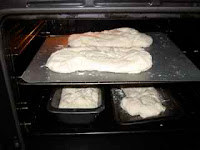
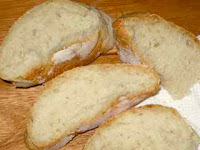
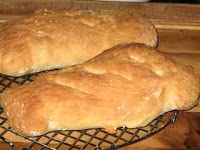
Finally, it's time to bake the bread.


It worked beautifully! It was great fresh from the oven. It makes a lot of bread, though, so I had to freeze several loaves. Unfortunately, it wasn't as good thawed. But still nice with some butter or jam. I make this frequently now. My sons love it, and so does my husband. And I don't have to buy supermarket bread anymore.

Friday, 16 May 2008

Meringue

Far too often, I've found myself with leftover egg whites from recipes that call for the yolks only. And the most recent one being the apple pie. Usually, I just dump the whites into some soup the next day or steam it up for lunch. I knew that I could probably find many recipes calling only for whites but I really keen to launch 2 back to back baking sessions just so I could use up the whites. That is, until I read Jamie Oliver's "Cook with Jamie" and read how easy it would be to whip up some meringues.
Basically, you need to make sure that all your equipment is dry and has absolutely no trace of oil. And you do need an electric mixer for this. I imagine it would be a pain doing this by hand.

Then you whip up your egg whites still they form stiff peaks. The test, Mr. Oliver says, is to turn the bowl of whipped whites over your head. They shouldn't budge. Then you whip in your caster sugar for many minutes, until the mixture is all smooth and shiny. Don't overwhip or the mixture could collapse. You could fold in various ingredients to get flavoured meringues, but I just left it plain. It goes into the oven, and you vary the cooking time depending on whether you want it all crisp, or crisp on the outside and chewy on the inside.

I managed to get 8 huge blobs from 3 egg whites. They looked really pretty and dreamy! Once done, they were beautifully crisp on the outside and chewy on the inside. They were really easy to whip up. My mum was impressed, as she has heard and seen enough about collapsed meringues.


I'm not sure what I can use them for though. I mixed them with some ice-cream, and it was good. The crispiness of the meringues with the creaminess of the ice-cream. You can't really eat too many of them neat, as they are rather sweet. Perhaps I'll test out an eton mess recipe, but the berries will be a bother to get as they are quite pricey. Anyway, the meringues are now sitting in the refrigerator looking rather forlorn.


Thursday, 8 May 2008

Apple Pie

After a wonderful tete-a-tete with my weighing machine, I had resolved to take a break from the wonderful world of baking. But my resolve didn't last long. I was reading Jamie Oliver's Family Dinners, and was drawn to the apple pie recipe like bees to honey. I tried to resist. But the picture of the half-eaten golden yellow apple pie in the book dominated my thoughts. All I could think of was apple pie. Even cinnamon would invade my thoughts (even though the recipe doesn't call for any cinnamon).

Finally, I caved in. Afterall, I rationalised, apple pie contains apples, and we are supposed to get our daily apple right? =)

So off I went baking again.

Apple pie is a whole new territory. I have never baked a pie, though I have often thought of it. I think I might have made some shortcrust pastry in Home Economics classes a long time ago, but I forget. The pastry appeared easy enough to make. All I needed to do was to dump the ingredients in the food processor and blitz.
However, the rolling it out and laying it in the tin showed up my inexperience. My dough was rather crumbly and kept tearing when I tried peeling it off the board, which I had liberally dusted with flour. Perhaps the humidity in Singapore (and the really hot few weeks we've been having) doesn't help. Of course, the fact that my pie dish was 9 inches rather than 8 inches, as required by the recipe, made it worse, as I had to roll the pastry out even thinner. But Mr. Oliver says it's OK if "it tears or breaks - just patch it up - as it will look nice and rustic". So I patched up as best I could, as my confidence was rapidly melting.
The second part of the recipe involved peeling and chopping the apples and cooking them into a saucepan with the rest of the filling ingredients (sugar, ground ginger, zest of lemon, sultanas). The recipe called for Bramley and Cox apples, but they aren't readily available here (if at all), so I substituted Granny Smiths for the Bramleys and Red Delicious and Gala for the Coxes. I also used regular brown sugar instead of the fancy muscovado/ demerara sugar.

As expected, I had a tough time getting the dough to fit the top of the pie. Witness the number of tears in the pastry. Also the pastry rim was very very thin.
The result was a not very nice looking pie. The pastry was a bit overdone and burnt at the edges because the pastry was thin, and I had failed to adjust the cooking time accordingly. But I was hopeful, because, the smells emanating from my oven were just heavenly!


I spooned out some pie, dolloped some custard on it and dug in. Oh my, it was good pie. It wasn't at all heavy. Not too sweet, either. It was almost perfect. For the next slice, I took out a tub of Ben and Jerry's Vanilla ice-cream and attacked. Ah, now, perfect...

Wednesday, 23 April 2008

Chocolate Torte - Jamie Oliver Style!


This is my first non-Nigella recipe on this blog. It's from Jaime Oliver, whom I adore as well. I caught him making it on TV once (can't remember which series), and I scribbled it down because it was chocolate! It's basically like a flourless chocolate brownie/mousse thingy on a graham cracker crust. You mix cocoa powder, chocolate, eggs, sugar, golden syrup, sour cream, pour it into the crust and leave it in the oven. Easy-peasy!

It was gorgeous - it's mostly chocolate afterall. But it was hard to eat too much of it because it was really really rich. We found that it went very well with a scoop of haagen-daaz macadamia nut ice-cream, which toned down the richness of the chocolate. Best served after it's cooled and set on the outside and a little warm and slightly runny on the inside (it's too runny in my picture). Yummy!